Showing posts with label breakfast. Show all posts

1.31.2014

Morning Glory Muffin

I think I might be a little out of style here.  Are muffins even IN style now?  I love muffins!  Especially when they are actually cake disguised as something less dessert-ish.  Cake minus the frosting is a muffin in my mind, and a muffin is breakfast.  It's good for you, and it's portable, and it's easy to make and full of all sorts of good things.  Muffins were probably one of the very first things I ever learned to make as a kid.  I was involved with a great bunch of girls who had some ambitious moms!!  I don't think my mom was the ring leader, but she stepped right up and joined in.  We had a 4-H group!  

4-H in the United States is a youth organization administered by the National Institute of Food and Agriculture of the United States Department of Agriculture (USDA), with the mission of "engaging youth to reach their fullest potential while advancing the field of youth development".[1] The name represents four personal development areas of focus for the organization: head, heart, hands, and health. The organization has over 6.5 million members in the United States, from ages 5 to 21, in approximately 90,000 clubs.[2]

Every Tues. and Thurs. we would meet at a different home and a mom would teach us a different skill.  Honestly there are a few things I learned as that 8-9-10 year old little girl, that have stuck with me my whole life.  I wish I could remember how to crochet as well as I did back then, but I do know the reason for  "Just mixing until combined" when I make a muffin.  I remember the demonstrations of over mixing a muffin.  Worm looking tunnels would exist throughout the entire muffin, and the top of the muffin would be pointy.  I learned how to keep the "skin" from forming on a freshly cooked pudding.  I actually learned HOW to make that pudding.  Not just emptying a JELLO pudding box in a bowl and adding milk.

So it may be 30 years later, but I still use those 4-H skills every time I cook:)  I learned to use my HEAD, my HEART, my HANDS, and my HEALTH.  I'd say my experience was a success! These muffins were a success as well.  My 4-H skills came in handy.  Even if they're a little 1990-ish you will love them.  They are so full of goodness, and tastiness you'll make them again next Sat.  Enjoy!

Morning Glory Muffins
recipe adapted from Pillsbury Best Muffins and Quick Breads


1 cup All Purpose or Unbleached Flour
1 cup Whole Wheat Flour
1 cup sugar
2 teaspoons baking soda
2 teaspoons cinnamon
1/2 teaspoon salt
2 cups shredded, peeled apples
1/2 cup shredded carrots
1/2 cup coconut
1/2 cup raisins
1/2 cup chopped walnuts or pecans
3/4 cup oil
1/4 cup milk
2 teaspoons vanilla
2 eggs, beaten

DIRECTIONS
Heat oven to 350°F. Line with paper baking cups or grease 18 muffin cups. Lightly spoon flour into measuring cup; level off. In large bowl, combine all purpose flour, whole wheat flour, sugar, baking soda, cinnamon, and salt. Add apples, carrots, coconut, raisins and walnuts; mix well. Add oil, milk, vanilla and eggs; stir just until moistened. Fill lined or greased muffin cups 3/4 full. Bake at 350°F. for 20 to 25 minutes or until toothpick inserted in center comes out clean. Immediately remove from pans.


11.21.2013

100% Whole Wheat Blender Pancakes

I have a particular preference for MY morning pancake.  I have a recipe that I dare say IS the absolute best pancake on the planet.  Nothing can compare.  It's perfection, and so versatile.  I can turn it into Ham and Cheese Waffles, Banana Nut Pancakes, Chocolate Chip Pancakes, and even a crunchy Johnny Cake version of a pancake with the addition of a little corn meal.  It is simple and burned into my mind and I can whip any of the above mentioned in the time it takes to stir up a batch of Krusteez.  True story!  Slick as a whistle.   So why would I steer astray?  

It all started with James wanting to eat a little more healthy, and a little more WHOLE FOODISH.  You know we own a whole wheat bakery so you'd think I would use it a little more often in my home cooking.  I don't.  I leave that to James at the bakery.  It makes the most fantastic bread on the planet, but I don't use whole wheat flour often.  It may be the fact that whole wheat flour doesn't last.  Did you know that most of the nutrition in whole wheat flour is gone within 36 hours of grinding the wheat berries.  Yes you can store the whole wheat flour in your freezer, if you fresh grind it. But if you don't grind your own wheat berries fresh then store bought whole wheat flour is worthless.  The nutrition is long gone.  You're getting extra fiber, but that's about the only benefit.  I don't have a wheat grinder.  Well technically I do.  A 3000 lb. monster that we grind lots and lots of wheat fresh every single day at Great Harvest, but not at home.  

If you are in the same boat as me, you're going to like this recipe.  You do need a good little blender, but if you've got that you are set for some 100% fresh ground whole wheat pancakes.  They were awesome!  James loved the fact that we used a little of the wheat we keep in the storage room downstairs, and that is was ground literally 2 minutes before being used.  All the benefits of whole wheat in a delightful little pancake.  My kids really like these pancakes too.  They do have that distinct whole wheat flavor.  Delicious if you like that kind of thing:)  If I were you, I'd try these babies out this weekend.  Actually I think I'll make them tomorrow!  Enjoy!!

*You're going to need WHOLE wheat kernals for this recipe.  I used Hard Red Winter Wheat Berries. If you're not the typical Utah mormon who has hundreds of pounds of wheat stored in their basement you can still find whole wheat berries.  I've seen Bob's Red Mill carries whole berries. Honeyville Grain is one of my favorite places for bulk. I buy beans, almond meal, rice, pasta and of course wheat berries from these guys.  They have everything! Even Amazon has them.  


100% Whole Wheat Blender Pancakes

recipe adapted from Mels Kitchen Cafe (Thanks Mel!!)


1 cup wheat berries/kernels
1 cup buttermilk
1/2 cup milk (I actually only used 1/4 c. of milk. You can decide how thin you want your batter)
2 large eggs
2 teaspoons sugar
1 tablespoon baking powder
4 tablespoons butter, melted (I used Canola oil with great results. Easier.)
3/4 teaspoon salt


Combine the wheat berries/kernels and the buttermilk in a blender and blend on high for 3 minutes, until the mixture is smooth and thick.
Add the 1/2 cup milk and continue to blend for 2 minutes. Add the remaining ingredients and blend until the batter is smooth.
Cook the batter on a hot griddle or waffle iron:)  Of course Buttermilk Syrup makes everything taste better.  Here's a link to that recipe!  You'll want it!


11.04.2013

Homemade Greek Yogurt


I'm in love!  I'm in heaven every morning when I eat my homemade yogurt and granola:)  It actually took me an entire mile of running this morning to tell my girls how excited I was with this recipe!  So the granola may not always be homemade by me, but my husband makes a great granola at Great Harvest each week.  I can't complain.  I'm probably spoiled:)  A favorite friend of mine shared this recipe with me and I'm so glad she did!   I have come to realize that making your own yogurt isn't something only the die hard domestic goddess does, but anybody can.  If you want a yogurt that you control the ingredients in it, this is the recipe for you!  All it takes is 1 gallon of milk (Any variety, but I did use whole.  It made for a spectacular yogurt!), and 1 c. of a plain yogurt to use as your starter.  I used 1 c. of Fage yogurt.  Only 2 ingredients on it's label.  Skim milk and active yogurt cultures.  Not a single other thing!  Perfect for making my own yogurt.  A candy thermometer, and a warm cozy spot for your yogurt to "culture".  Mine was in my oven.  Some cheese cloth comes in handy, but a clean dish towel did the trick for me.  It will take some time, but your patience will be rewarded.  Wonderfully rewarded! I hope you have a lovely yogurt parfait sometime soon:)


Homemade Yogurt (makes 4 quarts, which will keep for at least a month in the fridge)
(here's a link to a great yogurt tutorial.)

Ingredients

1 gallon of milk (I used whole milk, but 1%, or 2% or even skim will work.)
1 cup yogurt starter (This is just 1 c. of a plain yogurt with live active cultures.  I used Fage and it worked magically.) 
Sugar, honey or sweetener of choice.  1/4-1/2 c. per quart of yogurt made.


1. You will need 4 quart sized Mason jars or other clean jars with a lid.

2. Pour one gallon of milk into a large, heavy bottomed stockpot or Dutch oven. Heat the milk to 185' F.  (You could actually throw in a vanilla bean if you wanted.  That's what I'm doing next time.)

3. Place the pot in a sink filled with ice and cold water and let the milk cool to 110' F.

4. Stir one cup of plain unflavored yogurt into the cooled milk, using a whisk. Stir well to ensure that the starter is thoroughly incorporated into the milk.

5. Pour the milk into the 4 quart sized Mason jars, and 1 pint sized Mason jar. (The pint sized bottle becomes your starter for the next batch of yogurt.) Put the lids and bands on.

6. At this point I preheated my oven for 2 or 3 minutes and then turned it off.  I placed the bottles of yogurt into the oven and shut the door for the night.  My yogurt was in the warm interior of the oven for approx. 12 hours.  I just let it sit over night.

At this point you can use your yogurt as is.  Sweeten it with honey or sugar, or don't.  This yogurt is the texture of regular Yoplait or other American yogurt.

**To make it into Greek yogurt you'll need the cheesecloth or dishtowel.  I poured 2 quarts of yogurt into a large dishtowel, tied a knock around a wooden spoon and hung it over a bowl in the fridge for about 6 hours.  At that point I had almost 4 c. of whey, and 4 c. of the most wonderful, thick Greek yogurt.   I stirred about 1/2 c. of honey into each quart of yogurt and it was just right:)  Enjoy with your favorite granola, or however you like it!


9.12.2013

Sweet Bee Berry Crepes

I have a new way to love crepes.  There's always the question of what to put on your crepe.  Nutella, Biscoff Spread, sweetened cream mixture with berries, bananas and strawberries, Nutella and bananas. Oh my word I could go on and on and on!  There are so many good ways to eat a crepe, but I think I've found a new favorite!!  We have the cutest little place in town called The Crepery.   Emma and I love it!  You can get a sweet or savory crepe there any time of the day.  I always get a more substantial savory lunch-ish type crepe every time I go, but Emma tried the Sweet Bee last time.  I actually made fun of her, but I have since eaten my words.  The Sweet Bee is so plain Jane, but I should have known there is NOTHING plain about Jane!  My sweet baby Jane is anything but plain. Same with the Sweet Bee.  A golden crepe lathered in butter and honey and folded.  Eaten as is.  It's heaven!!  I would never have tried something so ordinary, but let me just tell you that ordinary is sublime.  Honey is liquid gold, and it tastes so wonderful folded in a hot crepe.  I may have topped it off with a few fresh blackberries from the garden, and a dollop of whipped cream.  My new favorite crepe.  We'll be having them for brekky for the rest of my days:)


I double this recipe for my family of 6 and we are usually left still wanting a few.

Crepes
1 c. flour
2 eggs
1 c. milk
1/4 t. salt
2 T. melted butter
In a large mixing bowl, whisk together the flour and the eggs. Gradually add in the milk, stirring to combine. Add the salt and butter; beat until smooth. Heat a lightly oiled griddle or frying pan over medium high heat. Pour or scoop the batter onto the griddle, using approximately 1/4 cup for each crepe. Tilt the pan with a circular motion so that the batter coats the surface evenly. Cook the crepe for about 2 minutes, until the bottom is light brown. Loosen with a spatula, turn and cook the other side. Serve hot.

Cheese Filling
1 16 oz carton cottage cheese blended smooth with a wand blender
1/2 - 1c. powdered sugar (to your liking. We like it a bit on the sweet side)
a pinch of salt

Warm Berry Sauce
2 c. frozen berries of choice. We used Huckleberries that we had picked, but raspberries, blueberries, blackberries, or any kind work fantastic
1/2 c. sugar
1/2 c. water

Combine all ingredients together in a saucepan and bring to a boil. Let it boil for 3 minutes. Serve warm on crepes or waffles.

To make the crepes just spread a few tablespoons of the cheese mixture down the middle of a crepe. Roll it up and top with warm berries. We eat tons of these when we make them. Like 10-12 a person sometimes.
Sweet Bee Berry Crepe

Honey
Warm Berry Sauce
Butter
Whipped Cream

On the inside of the crepe spread a little butter, and drizzle the honey.  Top with warm berries and a little whipped cream!  Heaven!!


8.28.2013

Blueberry Almond Focaccia

I ripped a recipe out of a Bon Appetite a few months ago as inspiration for this recipe.  Does anyone else ever do this?  I learned once that when you're reading a magazine you should just rip out the pages you want to save instead of saving the whole magazine.  Do you know how many times I've had to control my ripping tendency in a dentist or doctors office.  How about the Landrover dealership!  That would be totally tacky there:)  I have a 3 ring binder BURSTING at the seams with magazine pages, handwritten scraps of paper, and dripped on recipes from my mom.  It barely fits into the drawer it's in.  If my house ever caught fire this binder would be one of my treasures I would rescue.  (After Jane of course!) The original recipe I "ripped" was a Cherry Almond Focaccia Bread made with a master sweet dough.  It got me thinking.  We love Onion and Cheese Focacia at our house.  Why wouldn't we love a sweet version.  It's not dessert type sweet, but the perfect sweetness to serve along side a lovely summer salad.  Maybe an Everything Salad with blue cheese, and fresh blueberries, and pears.  Yummy perfection!

Something about berries when they're cooked.  They just turn into deliciousness!  We loved watching the blueberries as they burst in the oven.  If you love blueberry pancakes, then this focaccia is definitely for you!  I didn't use the original Sweet Dough that the magazine suggested.  To time consuming for me.  I just used my favorite breadstick recipe.  It worked perfectly!  It's one of those recipes I don't even have to think about.  I have it memorized, and can whip up a batch in no time at all.  Technically you can top the focaccia with anything you'd like.  Cheese and onions, garlic and rosemary, pears and blue cheese, olives and salt.  Whatever you want!


Blueberry Almond Focaccia

1 T. yeast (I use SAF instant)
1 1/2 c. warm water
2 T. sugar
1/2 t. salt
3-4 c. flour
1/4 c. butter
1- 1 1/2 c. fresh or frozen blueberries
1 c. slivered almonds
1 c. sugar in the raw or brown sugar


Dissolve yeast in warm water. Mix and knead the sugar, salt and flour until it pulls clean from the bowl. Add more flour if needed. Let dough knead for 2-4 minutes. I plunk dough out on the counter and form into a ball and then place back in the bowl that I have greased. Cover with a towel and let sit for 10 minutes. I spray the counter with Pam and drop the dough onto it. I gently pat the dough into a large silver cookie sheet.  I believe it's about 12x18 give or take:)  Melt the butter and brush onto the bread sticks. Top with fresh blueberries, slivered almonds, and then sprinkle some coarse sugar or sugar in the raw on top.  It you don't have sugar in the raw, brown sugar will do. Or do something else like Italian Seasoning, and cheese. Use your imagination. Let rise until puffy.  Right before I place the foccacia in the oven I press my fingers into the dough to create some dimples.  You don't have to do this.  It just gives it the foccacia look.  Bake in a 375' F. oven for about 20 mins. Serve

8.09.2013

Liege Waffles

Can I just say, we made homemade ice cream for this Sunday dinner and it was delish!
I have never had a waffle on the streets of New York, or at a cute little vendor in Belgium, but my fabulous neighbor got me intrigued with these lovely little delights this summer.  Every June my neighbor takes a group of local high schoolers on a Fashion Trip to New York.  She teaches Fashion Merchandising  for the local applied technology college.  The trip is a whirlwind of hitting Broadway shows, shopping, going to different fashion houses, and all the other wonderful things of New York.  On her last trip I asked if she would Instagram some of their adventures so I could see all the fun they were having. Of course the particular Instagram that caught my eye was of the waffle she had for breakfast one day.  It was a picture of this waffle in a paper tray, loaded with ice cream, tons of fresh raspberries, a drizzle of honey, and a dollop of cream.  She posted that it was the best thing she had ever eaten in her life!  Immediately I had to have one of these waffles.  Preferably with the berries, ice cream and honey.  As I was searching recipes my kids informed me there's a great waffle joint in SLC,  Bruges Waffles and Frites, that they frequent every time they visit their favorite bike shop.  I'm just the mom.  I know nothing I've decided of my kids whereabouts! Next visit to the big city will take me to this place, but since I'm not headed that direction for a bit I made my own.

I actually purchased the pearl sugar that the waffle calls for. We have a local specialty store that carries it.  Or you can use sugar cubes all busted up.  Go to town with your rolling pin and bash out all your frustrations.  The pearl sugar is about the size of rock salt, and they melt in the waffle iron into a gooey wonderfulness.  The waffle batter isn't a batter at all.  More of a bread dough.  A Brioche dough actually. (Brioche (/ˈbrioʊʃ/ or /ˈbriɒʃ/; French: [bʁi.ɔʃ]) is a pastry akin to a highly enriched bread of French origin, whose high egg and butter content give it a rich and tender crumb. It is "light and slightly puffy, more or less fine, according to the proportion of butter and eggs") Lots of eggs and butter in addition to the regular bread ingredients.  I made the waffles on a beautiful Sunday afternoon and by Sunday evening we had waffles for dinner!  The waffle itself was really sweet due to the large amount of pearl sugar.  But with the addition of ice cream and honey as the toppings or dinges as the Belgium's call them, the waffle was dessert.  The next time I make the waffles I'm only going to add 1/2 c. of the pearl sugar.  I think that will be just right. You can top the waffle with all sorts of treats.  Nutella or better yet, Biscoff Spread.  Bananas and berries, or you can just have syrup if you want.  

So my call to action for this post is this:  If you've ever had a Liege Waffle on the streets of anywhere, try this recipe and let me know how it compares.  Was it close?  Not even?  I would love to hear your thoughts.  And trust me, the next time I'm in a big city I WILL have a waffle!!  

Liege Waffles
recipe courtesy of Allrecipes.com

1 (.25 ounce) package active dry yeast (1 scant T. yeast)
 1 1/2 tablespoons white sugar
 3/4 cup lukewarm milk
 3 eggs
 1 cup melted butter
 2 teaspoons vanilla extract
 3 cups flour
 1/2 teaspoon salt
 1 1/2 cups pearl sugar (such as Lars' Own®)
(I would only add 1/2 c. and if you don't have pearl sugar use raw sugar or bust up some sugar cubes.  It will totally work.)
Directions

Sprinkle the yeast and white sugar over warm milk in a small bowl. The milk should be no more than 100 degrees F (40 degrees C). Let stand for 15 minutes until the yeast softens and begins to form a creamy foam.
Whisk the eggs, melted butter, and vanilla extract into the yeast mixture until evenly blended; set aside. Stir together the flour and salt in a separate large bowl, and make a well in the center. Pour the egg mixture into the well, then stir in the flour mixture until a soft dough forms. Cover with a light cloth and let rise in a warm place (80 to 95 degrees F (27 to 35 degrees C)) until doubled in volume, about 30 minutes. Gently mix in the pearl sugar.
Preheat a waffle iron according to manufacturer's instructions.
Place a baseball-size ball of dough on the preheated waffle iron. Cook waffles until golden and crisp, about 2 minutes. Repeat with remaining dough. Allow waffles to cool for 2 to 3 minutes before serving.

6.20.2013

Baked French Toast

I love this stuff!  And in all actuality, you can call it breakfast or dessert and you'd be correct on both counts.  For breakfast we call it Baked French Toast, but it also can appear as Bread Pudding if you serve it with ice cream:)  I've been trying to decide what to serve for Jed's mission farewell in a week, and I think this is the route we're going to go.  Brunch.  A little bit of breakfast food, and a little bit of lunch food, and lots of friends and family.  We should have a wonderful time.  Jed leaves on July 3rd for the Missionary Training Center in Provo, UT and will be there for 11 weeks learning Albanian.  Then it's off to the Adriatic South Mission for the Church of Jesus Christ of Latter-Day Saints!  Wow!  I swear he was just a little boy in primary just yesterday.  I love him:)

If you need a good brunch idea for your missionary farewell, 4th of July festivities, or just a wonderful Sat. summer breakfast go for this.  It's awesome, and you will love every last bite.

Baked French Toast
Recipe from The Pioneer Woman and slightly adapted by me

FRENCH TOAST
1 loaf Crusty Sourdough Or French Bread
8 whole Eggs
2 cups Whole Milk
½ cups Whipping (heavy) Cream (if you have it.  Sometimes I just use 2% milk.)
1/2 cups Sugar
1 t. Vanilla Extract

Topping
½ cups All-purpose Flour
½ cups Firmly Packed Brown Sugar
1 teaspoon Cinnamon
¼ teaspoons Salt
1 stick Cold Butter, Cut Into Pieces
Fresh Fruit (optional, but I'm totally going to add frozen blackberries the next time I make this!)

Preparation Instructions
Grease 9 x 13-inch baking pan with butter. Tear bread into chunks (or cut into cubes) and evenly distribute in the pan.
Mix together eggs, milk, cream, sugar, and vanilla. Pour evenly over bread. Cover tightly and store in the fridge several hours or overnight.
In a separate bowl, mix flour, brown sugar, cinnamon, and salt. Add nutmeg if desired. Add butter pieces and but into the dry mixture until mixture resembles fine pebbles. Store in a Ziploc in the fridge.
When you’re ready to bake the casserole, preheat oven to 350 degrees. Remove casserole from fridge and sprinkle crumb mixture over the top. (If you’re using fruit, sprinkle on before the crumb mixture.) Bake for 45 minutes for a softer, more bread pudding texture. Bake 1 hour or more for a firmer, less liquid texture. (I baked it 1 hour and 15 mins.)
Scoop out individual portions. Top with butter and drizzle with maple syrup. (Better yet, Buttermilk Syrup!)   You could totally serve this as dessert as well.  Just add some vanilla ice cream and your set to go. )

Buttermilk Syrup

1/2 c. butter
1/2 c. corn syrup
1/2 c. buttermilk
1/2 t. baking soda
Bring to a boil. Make in a big pot because it foams up a ton. Boil for about 5 mins until a thick caramel color. Take off heat and add 1/2 t. vanilla. This is to die for. Serve with anything. It is fabulous over fresh fruit, pound cake and peaches, or anything that needs a little sauciness.


4.23.2013

Breakfast Pizza


This was pure loveliness in every sense of the word.  Two of my favorite things rolled into one delicious dish!  Relatively quick, easy, and it produced tons of yummy sounds when served.  I'm sure there's many out there in the great big world who are big breakfast fans.  If you were to offer me a huge  surf and turf buffet or a glorious breakfast buffet, I bet you can tell which one I'd choose.  Breakfast for sure.  Easter Sunday for this little family of mine was wonderful.  James only had a few church meetings early on, and was able to attend all of our regular meetings with the fam.  Granted he doesn't sit next to us, but I can smile at him up front, and he smiles right back.  It's nice to see him:) Church got out early, and we had decided Easter Brunch was in order.  I had seen this recipe on Pinterest a few weeks prior, and decided it was the perfect meal for Easter.

I have a favorite Pizza Crust recipe here, that only requires a little advanced thinking.  The night before the dough needs to be stirred together, but that's it.  The day of, all that is needed is topping prep, assembly, and a quick bake and breakfast is served.  I can't think of anything better for a Mother's Day brunch.  Serve with some fresh fruit, or a Green Lemonade, maybe some bacon or sausage, a Ratatouille would be awesome, and some fresh Rice Pudding for dessert.  Oh that sounds soooo good!  Your mom will love your guts even more than she does now.  Or if you're in the same shoes as me and will be preparing your own Mother's Day meal, this menu is easy, and quick.  I hope you like it as much as I do:)  xoxoxo
Breakfast Pizza
recipe adapted from this recipe from the New York Times


Dough

Ingredients
7 1/2 cups (1000 grams) all-purpose flour plus more for shaping dough
4 teaspoons fine sea salt plus more for seasoning
1/2 teaspoon active dry yeast
3 c. warm water

Toppings (create your own)
Olive oil
eggs (I used 4 on each of the 2 pizzas I made)
4-6 slices of bacon chopped per pizza (I pre cooked the bacon slightly to give it a start.  It finished perfectly in the oven since the heat is so high.)
Any other sort of favorite toppings:
sun dried tomatoes
fresh tomatoes
olives
thin sliced red or other waxy potato
prosciutto
crumbled sausage.....the list goes on and on

Preparation

Whisk flour, salt, and yeast in a medium bowl. While stirring with a wooden spoon, gradually add 3 cups water; stir until well incorporated. Mix dough gently with your hands to bring it together and form into a rough ball. Transfer to a large clean bowl. Cover with plastic wrap and let dough rise at room temperature (about 72°) in a draft-free area until surface is covered with tiny bubbles and dough has more than doubled in size, about 18 hours (time will vary depending on the temperature in the room).
Transfer dough to a floured work surface. Gently shape into a rough rectangle. Divide into 6 equal portions. Working with 1 portion at a time, gather 4 corners to center to create 4 folds. Turn seam side down and mold gently into a ball. Dust dough with flour; set aside on work surface or a floured baking sheet. Repeat with remaining portions.
Let dough rest, covered with plastic wrap or a damp kitchen towel, until soft and pliable, about 1 hour. DO AHEAD: Can be made 3 days ahead. Wrap each dough ball separately in plastic wrap and chill. Unwrap and let rest at room temperature on a lightly floured work surface, covered with plastic wrap, for 2–3 hours before shaping.

To Make the Pizzas
During the last hour of dough's resting, prepare oven: If using a pizza stone, arrange a rack in upper third of oven and place stone on rack; preheat oven to its hottest setting, 500°–550°, for 1 hour. If using a baking sheet, arrange a rack in middle of oven and preheat to its hottest setting, 500°–550°. (You do not need to preheat the baking sheet.)
Working with 1 dough ball at a time, dust dough generously with flour and place on a floured work surface. Gently shape dough into a 10"–12" disk or in my case I tried to spread the dough as big as my cookie sheet.  You can do individual pizzas or 2 family sized pizzas.

Top pizzas.  Here's what I topped my pizza with:  A light drizzle of Olive oil
I cracked 4-5 eggs on top of the dough
Sprinkled the par cooked chopped bacon
liberal salt and pepper

*(Here's my tip inserted here.  I didn't use a pizza peel or a pizza stone.  We formed our pizzas on a silver cookie sheet and called it good.  They turned out amazing and crisp and blistered.  So don't worry if you don't have a pizza stone.)  

Bake pizza, rotating halfway, until bottom of crust is crisp and top is blistered, 5–7 minutes. 

At this point I took the pizza out of the oven and drizzled about 1/4 c. cream over the surface of the pizza and sprinkled 1/4-1/2 c. of Parmesan cheese on top.  Return to the oven for 1-2 minute until cream and cheese are bubbly.  Top the cooked pizza with fresh sliced green onions and serve. 


4.04.2013

My Morning Lemonade

Last week I joined a friend and went on a "Spring Clean" juicing week.  For 7 days I did it!  The first few were hard.  The best way to describe how I felt was blue.  I wasn't really hungry, and I didn't really have horrible cravings, I just wanted to eat.  I had lost a favorite thing, and I missed it.  Eventually that went away, and I felt great!  Fantastic is a good word to describe it.  James kept looking at me and commenting on how I was glowing:)  He's just a nice guy, but really my skin did look so pretty.  To be honest I didn't loose any weight, but I would do it again in a heartbeat for how it felt.  You felt clean, and I was still able to keep running and do everything I usually do.  Thanks to my friend Kristie for challenging me, and many others.  Here's a link to her website.  (She actually just started a 30 day RAW challenge if you're interested.)

Every morning I started with this Lemonade.  Actually I still make it most mornings because I love it!  If you google benefits of Lemon Water there are a ton.   I'm no expert, so I won't tout any great benefits other than it's such a nice way to start the day.  Don't worry if you don't have a juicer.  Just do your best to squeeze all the love out of that lemon and orange and you'll be just fine.  I like to use warm water when I make this, but ice cold would be great too.

My Morning Juice
recipe courtesy The Belly Fit Club

1 orange peeled and juiced
1 lemon peeled and juiced

Place in quart sized Mason jar, and fill to the top with water.  I like warm water, but do what you like.  Add sweetener to taste.  I use a good squeeze of Stevia, but anything would work.  Sip and enjoy!

1.16.2013

Good Morning Juice

I juice a lot this time of year.  Something about all the beautiful citrus available, and my need to have a healthy family.  They go hand in hand you know:)  Each morning as my children are just about to head out the door for the bus, they each get a big glass of Carrot Orange Juice.  I usually sneak an apple or two in as well, and I really try to up their carrot consumption.  Some of the kids love it, and others tolerate it, but they all drink it.

I'm turning into my mom actually.  As a kid she juiced all the time.  In fact I remember the skin on the palms of her hands being a lovely shade of orange most of my growing up years because of her carrot juice habit.  I believe my mom came by it naturally though.  Her parents were big juicers.  I used to  run over to my Grandma B's house on a summer morning, bust through their door without knocking, and walk into the kitchen to say hi, just as my grandma and grandpa were drinking down their Carrot Celery Juice.  My grandma told me the carrot helped the celery not taste too bitter and the celery helped the carrot not taste so sweet.  They drank a cup of this concoction everyday I'm sure.  If you walked through their door early enough in the morning, you could always have a sip if you wanted.

There's so much out there about juicing.  It's the "buzz" word right now.  But you know, it's tasty most of the time, and dang good for you so why not drink up.   Mary Poppins always said a spoonful of sugar helps the medicine go down.  Well an apple or a pear makes kale go down too:)  I'll share a few of my favorite juices over the next few days and share what I like, and what I don't.  So to start here's the juice that James and I have almost every day.  Good Morning Juice.  Feel free to add what you have on hand.  I love it with some pineapple, and James doesn't particularly love the grapefruit in his, but beggars can't be choosers.  And remember, the recipe is a "guideline", not an exact recipe.  Mix it up, and see what you like.


Good Morning Juice


Ingredients
  • 1 Grapefruit
  • 3 Oranges
  • 1 Pear
  • 6-7 Carrots
  • 1 Apple
Cooking Directions
  1. Wash carrots, apples and pears. Peel oranges and grapefruit. I cut all my fruit into quarters to fit in my juicer, but depending on your juicer, you may not have to. This amount of fruit makes approx. 32 oz. of fresh juice.


10.15.2012

Gingerbread Waffles

I have a huge apology to offer.  I am soooo sorry to leave the post of Chocolate Cake up for so long.  I had one of my friends tell me the other day that that picture was killing her.  She had gone to my blog to find the Marinara recipe and all her kids could say was, "Please make that Chocolate Cake!"  I'm afraid to admit I was out of town for a week and didn't look, but now that I'm back, it's haunting me.  The recipe today probably isn't much better, but at least it's not Chocolate Cake:)  Sorry friends!

Gingerbread Waffles are my favorite thing on the planet!  I've seen lots of pumpkin waffles, and pancakes, but not Gingy Waffles.  My mom started making these for us years ago, and it was always such a treat.  I've blogged about them before, but tis the season to start thinking about them again.  Actually I love them in Feb. and June, and just about any month.   They're perfect for Christmas morning, or the day after Thanksgiving brunch, or just any Saturday of the year.

My grandma B. used to make Gingerbread cake for my mom and she'd serve it with whipped cream with mashed bananas folded in.  This recipe is along those same lines, but I up the ante with Buttermilk syrup as well.  These really are good leftover as well.  They don't need anything on them later in the day or during church.  They're delicious on their own.  So as the weather gets a little chilly, and you're craving something festive give these a try.  Sat. is only a few days away.


Gingerbread Waffles

1/2 c. butter melted
1/2 c. brown sugar
1/2 c. molasses
2 eggs
 1 1/4 c. milk
2 c. flour
1/2 t. baking powder
1 1/2 t. cinnamon
1 t. ginger
 1/2 t. salt

Mix all together with a hand mixer and place on a hot greased waffle iron.  Serve with Buttermilk Syrup (here's a link to that recipe), sliced bananas, and whipped cream.  You may need to double the batch.  You'll want leftovers.

Buttermilk Syrup from Hollie with a twist from my friend Jill

1 cube butter
1/4 c. corn syrup
1/2 c. buttermilk
1/2 t. baking soda
3/4 c. sugar
1/2 t. vanilla

Place in a big pot. This stuff foams out of control at first. Bring to a boil and then let boil until it turns a nice dark golden brown. About 8-10 mins. I usually 3 times the batch and it will make about a quart. I don't 3x's the butter though. Maybe only 1 1/2 cubes of butter to a 3 batch. 


7.31.2012

Awesome Granola

I'm camping in the middle of Jackson Lake in Teton National Park and I'm still able to Instagram, blog and check my email. Just think, I could have instant coverage of the bear that comes to our camp. You can live the excitement with us. This is our 7th Summer camping here. The first few years we canoed up String Lake and then portaged to Leigh Lake. It was beautiful, but we had a few to many bear encounters. Now we take the boat to Jackson Lake and camp at either South Landing or Elk Island. We're at Elk Island this year and it's spectacular. I'm still trying to figure why we seem to be the only people here. The park was more crowded than I've ever seen yet we're they only souls on the lake. The waterskiing and boating is awesome and the scenery is amazing. I'm sorry you're missing it.

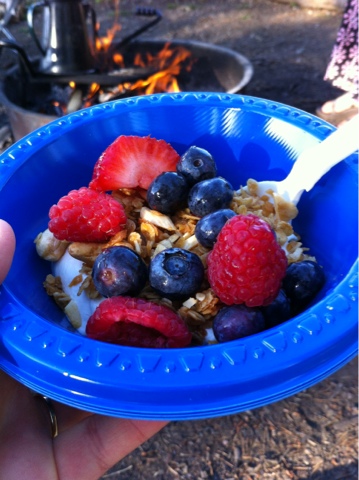
This mornings brekky was yogurt parfaits. It's a FAVE at our house. My sister in law Susan made this last week at our family reunion and it was delish!! The recipe comes from Alton Brown and is simple. Add some extras if you want. Make it your own. But definitely bring it camping next time. And we're here until Weds. night if anyone would like to join us:)

Awesome Granola
Courtesy of Alton Brown Food Network

Ingredients
3 cups rolled oats
1 cup slivered almonds
1 cup cashews
3/4 cup shredded sweet coconut
1/4 cup plus 2 tablespoons dark brown sugar
1/4 cup plus 2 tablespoons maple syrup
1/4 cup vegetable oil
3/4 teaspoon salt
1 cup raisins
Directions
Preheat oven to 250 degrees F.
In a large bowl, combine the oats, nuts, coconut, and brown sugar.
In a separate bowl, combine maple syrup, oil, and salt. Combine both mixtures and pour onto 2 sheet pans. Cook for 1 hour and 15 minutes, stirring every 15 minutes to achieve an even color.
Remove from oven and transfer into a large bowl. Add raisins and mix until evenly distributed.

6.12.2012

Stuffed Orange French Toast

Here's a little secret.  My husband is a baker, we own a bakery, but....................the best French Toast on the planet is made with a cheap loaf of French Bread from your local grocer.  I'm talking the loaf that is hot at the check stand at about 4pm and costs a buck.  It's perfect for French Toast.  My mom used to make it for us as kids, and the trick is to fry the slices in a bit of oil or butter.  Extremely low calorie, and low fat I know, but Father's Day is around the corner and it's a good excuse to be a little extreme:)

To up the ante a little I stuffed our toasts with Almond Honey Cream Cheese.  Another low calorie suggestion.  The egg batter had the zest of an orange, and it was yummy!  James loved it.   He ate 4 slices and it wasn't Father's Day when he did.  Of course I served it with Buttermilk Syrup, and tons of fresh berries.  Whipped cream would crown the meal, but I found a little Greek Yogurt was delish as well.  So make Father's Day wonderful.  Eat this for breakfast, or brunch or you could call it dessert.  Just enjoy every mouthful to the fullest!


Stuffed Orange French Toast

1 loaf French Bread cut into at least 1 inch slices
8 oz. of your favorite flavored cream cheese (can you imagine it with that new chocolaty kind!)

I cut a pocket or slit into each slice of bread and slathered some cream cheese inside.  

6 eggs
1/4 c. milk
zest of 1 orange
1 t. vanilla

Mix all these ingredients together until completely combined.  Dip each piece of bread in the egg mixture just until coated.  I hate soggy bread:(  Place on a griddle and if you're feeling extra happy pour some oil on the griddle or pan and fry the French Toast.  Cook for about 4 minutes on each side or until the toast is browned.  Sprinkle with powdered sugar and top with fresh berries, Buttermilk Syrup, and Greek Yogurt.

5.22.2012

Mormon Muffins

There's this great place I used to go to as a kid.  It's called Rainbow Gardens.  It's lovely, and wonderful.  As a kid we'd go bowling there for birthday parties.  They had the best penny candy selection as well as sticker collection.  And they had the best Christmas displays.  You could find all sorts of fun gifts there, or if you really liked someone, you'd get their wedding gift there.  The restaurant inside is famous.  It's where all the ladies would lunch.  My mom and her sisters would go there.  I'd go there with the work girls.  Turkey Enchiladas and a Mormon Muffin is what I always ordered.  The Mormon Muffin was the best part of the whole meal.

I'm not sure why they're called Mormon Muffins.  Maybe we Mormons have the corner on fiber, or maybe it's the muffins wholesomeness.  Just like me.  (I'm sure my mom and James would beg to differ on this point.)  Just teasing, but I can say these muffins are very very tasty!!  This recipe came directly from the Rainbow Gardens website.  They're so kind!  I love a person who shares their deliciousness.  (I feel like a hypocrite saying that since I won't share my GH Bread recipes.  I might go to heck!  Don't judge me to harshly.)  But the recipe is easy and makes a ton of muffins.  I made about 3 dozen enormous muffins.  If you don't fill the muffin cups heaping you'll probably get 4 dozen.  But I like them big, and round, and puffing over the edges.  The muffins freeze well, or you can keep the batter in the fridge for 6 weeks.  It's that kind of recipe.  So trust me on this and make a big batch of goodness.  You're innards will thank you!


Rainbow Gardens
Mormon Muffins

2 cups boiling water

5 teaspoons baking soda
1 cup shortening
2 cups granulated sugar
4 eggs
5 cups all-purpose flour
1 teaspoon salt
1 quart buttermilk
4 cups all-bran cereal
2 cups bran flakes
1 cup chopped walnuts
2 c. chopped dates

Directions
Combine water and baking soda. Stir until dissolved. Cool.
In a large mixing bowl, cream sugar and shortening.
Add eggs one at a time, beating well after each addition.  Add the soda water.
Combine flour and salt and add to cream mixture alternately with buttermilk.
Fold in both cereals and nuts.  At this point let your batter sit for an hour or even better overnight.  At first the batter is rather thin, but as soon as the cereal sogs up a bit it will thicken right up.
Fill greased or paper lined muffin cups full.  Mine are actually heaping full.
Bake at 350°F for 25-30 minutes until they test done.
Muffin batter may be kept for 1 week in refrigerator and baked in smaller batches if desired.


4.13.2012

Breakfast Today

I'm trying out my new mobile app. My brekky on the go! Actually I can't seem to locate my camera so you get the iPhone photo. Since our little get away for Spring Break I'm hooked on this breakfast. My friend R introduced me to this wonderful Kale Hash. We love kale at our home but have limited ourselves to eating it in soup only. Now we eat it a lot. My garden is always bountiful with kale but I'll admit most goes to waste at the end of the season. No longer! You can serve it as a side for dinner or my favorite, breakfast. Sorry to all my "totally cooked egg friends". I love a runny egg dripping off my hash! Delish!! I hope you try this recipe out. It's so healthy for you and it tastes yummy. You can use spinach, chard, beet greens, or collard greens as well. I love adding tomatoes and whatever else I have. Enjoy and happy weekend!!

Kale Hash

1 bunch kale washed and chopped ( I use most of the stems as well)
1 tomato chopped
1 red pepper chopped
Zucchini
Carrots......... You get the idea! Add whatever you have.

In a large skillet drizzle about 2 t of olive oil and add veggies. Stir fry until tender. 5 mins or so. You can add a little garlic too for some more deliciousness. Serve as a side dish or top with a perfect fried egg.

3.22.2012

Ham and Cheese Waffles

Oh ya baby!  These were AMAZING!  This has been a week of pure winners at my home.  Usually when I try a new recipe there are probably more losers than winners, but we've had two in a row.  Tues. nights are a bit crazy for us.  It's most likely the same for most everybody out there.  One night a week, everything that could possibly happen occurs on that one night.  So Tues. nights are "Eat As Fast As You Can" nights, and "Eat Whatever There Is" night as well.  Emma suggested making these Ham and Cheese Waffles.   I had ripped the recipe out of the same Bon Appetit magazine that the pizza dough came from and it was sitting on the counter just waiting to be made.  What a winning issue! Well the waffles were a huge hit!

I love breakfast for dinner.  We have breakfast for dinner probably three times a month at our house.  Waffles, pancakes, and breakfast burritos are the usual.  But Huevos Rancheros is one of my personal faves.   I'm going to share one of my most infamous Breakfast for Dinner moments.  Infamous meaning having a bad reputation, or in other words, not my best moment.  Actually it was a great moment for me, but my family on the other hand............

I had been married to my Jimmy for just a few weeks.  We had a cute little basement apartment, and I was learning how to cook on a daily basis.  I wasn't too good.  But at least I was willing to work at it.  One day I had gone to the grocery store and strawberries were on sale.  I bought an entire case.  I had decided I was going to invite my parents and sibs out for dinner.  We were going to have waffles and strawberries and cream.  I was sooooo excited to show off my domestication.  I bought an enormous bag of Bisquick, cream and all those strawberries.  I was feeding 8 so I was prepared with tons of food.

The waffles were beautiful.  The strawberries were even prettier, and I was thrilled.  Soon the doorbell rang, and in came my mom and dad, sister and three little brothers.  Yeah!  We were going to have a party.  Everything was ready, the prayer was said, and we were ready to chow down.  At least I was.  As everyone started, I noticed nobody was really eating.  They were taking a token piece of waffle, but they weren't eating the way we did at home.  I was shocked.  Did it taste sick?  Finally I asked why nobody was eating?  My youngest brother yelled out, "Dad took us to McDonald's on the way here.  They didn't think you'd have enough food for all of us."  I was dejected.

To this day we still laugh about that.  And to this day, I remind my dad to not stop at McDonald's on his way to my house:)

I think you should have breakfast for dinner sometime soon.  Try these Ham and Cheese Waffles, and I promise you will love them.  You probably need some of this Buttermilk Syrup with it as well.  Might as well make it complete.  I'll leave a link to the original waffle recipe from Bon Appetit, but I just used my old standby.  I added butter instead of oil, and upped it a bit.  It was spectacular.  Enjoy!


Ham and Cheese Waffles
recipe adapted from THIS recipe from Bon Appetit

2 c. flour
1 t. salt
1 t. baking soda
2 t. baking powder
2 T. sugar
2 eggs
1/2 c. melted butter
2 + c. buttermilk (I usually add a little extra until it's the consistency I like)

Mix all the ingredients together until almost smooth.  Spray a waffle iron with non-stick spray and pour your batter on the hot iron.  Before you close the lid, sprinkle a small handful of shredded cheddar cheese, and a small handful of diced slices of deli ham.  Close iron and cook until the waffle is done.  Usually around 4-5 mins.  Serve waffles hot with Buttermilk Syrup, and a huge smile!

Buttermilk Syrup
1 cube butter
1/4 c. corn syrup
1/2 c. buttermilk
1/2 t. baking soda
3/4 c. sugar
1/2 t. vanilla

Place in a big pot. This stuff foams out of control at first. Bring to a boil and then let boil until it turns a nice dark golden brown. About 8-10 mins. I usually 3 times the batch and it will make about a quart. I don't 3x's the butter though. Maybe only 1 1/2 cubes of butter to a 3 batch. This stuff is awesome on pancakes, coconut pound cake with fresh blackberries, and peaches.

LinkWithin

Related Posts with Thumbnails